
Maintain Separate Configs for Dev, Beta and Release Build Targets
This is part four of a four part series (😆 🎉 👏) and assumes you’ve already set-up continuous integration with our sample project. If you haven’t already, I highly recommend reading part one, Continuous Integration for Cordova Apps, where we setup the build server used in this tutorial.
Change Your App’s Configuration Based on Branch
In parts I - III, we used Visual Studio Team Services (VSTS) to setup build definitions for unit testing, beta testing and over-the-air updates. All three of our build definitions run using continuous integration on a single branch (i.e. the master branch). Consequently, every time we push a code change, all three of these build definitions run.
- Android-Dev: runs Karma+Jasmine unit tests to ensure code quality
- Android-Beta: distributes the app to manual testers via HockeyApp
- Android-Release: distributes app updates to the public via Code Push
Frankly, this is bad. We don’t want to distribute a beta release every time there’s a feature check-in and we sure as hell don’t want to release in-development features to the public. To control what happens at check-in, we need a branching strategy. We need to run a different set of build steps depending on which branch receives the commit.

Two Big Advantages
By creating a unique branch for each release type, we gain two big advantages.
First, we can maintain a different set of config files for each branch – enabling us to use different API keys or service providers for each release type. For example, imagine that you want to use the “Staging” Code Push deployment key during development, but the “Production” deployment key when you release to the public. Using this technique, you can dynamically switch the keys during continuous integration.
Second, we can trigger different build steps for each branch. For example, we can run unit tests every time we push to the “dev” branch without actually releasing anything. When we’re ready for user feedback, we can release to beta testers via HockeyApp by pushing to the “beta” branch.
To realize our dream, we must:
- Update the Source Code
- Create a branch for each build definition
- Create config files for each build definition
- Add gulp tasks to move and rename the config files before build
- Configure VSTS
- Change each build definition to trigger based on branch
- Source the build from the appropriate repository
- Add a custom gulp build step within each build definition
Update the Source Code
Let’s start by creating three new branches at the terminal:
# create a dev branch to trigger CI unit tests
git checkout -b dev
git commit "create dev branch"
git push

# create a beta branch to trigger CI hockeyapp distribution
git checkout -b beta
git commit "create beta branch"
git push

# create a release branch to trigger CI codepush distribution
git checkout -b release
git commit "create release branch"
git push

# respect the proper code flow; start in the dev branch
git checkout dev
Right now, all three branches are a carbon copy of the master branch. Each branch can operate independently, but ideally the code should flow from dev to beta to release. Thus, we start by making all our changes in the dev branch.
Give each branch a custom config.xml
In a “normal” local development environment, Cordova build depends on a config.xml file in the root directory to define things like icons, splash screens and the App ID. To support different configurations for each branch, I’ve created a special /config folder with XML and JS files for each release type (i.e. dev, beta and release). Let’s compare a few lines from dev.xml and beta.xml to see what’s different:
Switch the Code Push Deployment Key
This code snippet from /config/dev.xml shows where we declare the Code Push deployment key.
<platform name="android">
    <preference name="CodePushDeploymentKey" value="YOUR-ANDROID-DEVELOPMENT-DEPLOYMENT-KEY" />
</platform>
<platform name="ios">
    <preference name="CodePushDeploymentKey" value="YOUR-IOS-DEVELOPMENT-DEPLOYMENT-KEY" />
</platform>
We don’t want to use the same key in both development and production, so we’ll use a different key in /config/release.xml
<platform name="android">
    <preference name="CodePushDeploymentKey" value="YOUR-ANDROID-PRODUCTION-DEPLOYMENT-KEY" />
</platform>
<platform name="ios">
    <preference name="CodePushDeploymentKey" value="YOUR-IOS-PRODUCTION-DEPLOYMENT-KEY" />
</platform>
Give each branch a custom Gulp task
Our release-specific config files are defined in code, but we still need to move them to a place where Cordova can find them at build time during CI. To move the config files dynamically, we’ll create a gulp task that VSTS can run immediately before Cordova build. Each gulp task will rename the config files and copy them to the appropriate directory. So, for example, gulp release will:
- Rename release.xml to config.xml and move it to the project root
- Rename release.js to config.js and move it to /www/js/
The ✨magic✨ happens in gulpfile.js:
// prepare for public release
gulp.task('release', function() {
    gulp.src('./config/release.xml')
    .pipe(rename('config.xml'))
    .pipe(gulp.dest('.'));

    gulp.src('./config/release.js')
    .pipe(rename('config.js'))
    .pipe(gulp.dest('./www/js'));
});

// prepare for beta distribution
gulp.task('beta', function() {
    gulp.src('./config/beta.xml')
    .pipe(rename('config.xml'))
    .pipe(gulp.dest('.'));

    gulp.src('./config/beta.js')
    .pipe(rename('config.js'))
    .pipe(gulp.dest('./www/js'));
});

// prepare for development environment
gulp.task('dev', function() {
    gulp.src('./config/dev.xml')
    .pipe(rename('config.xml'))
    .pipe(gulp.dest('.'));

    gulp.src('./config/dev.js')
    .pipe(rename('config.js'))
    .pipe(gulp.dest('./www/js'));
});
You can use the same technique to customize anything in response to a build definition. And as you might have guessed, the technique isn’t limited to XML and JS. You can do all sorts of things:
- Change your app icon and splash screen to display a “beta” badge only in the beta release
- Use a different API key for services like maps, analytics, data sync, etc. in production
- Show features only in development builds
That wasn’t too bad, now was it? Take a break, catch your breath and regroup by playing a song in your headphones. I recommend “Street Lights for a Ribcage” by Sleepy Eyes of Death.
Configure VSTS
Our code is setup to dynamically rename and move config.xml using a Gulp task. Now, we need to automate the process using continuous integration in VSTS. For each build definition, we’ll add a Gulp build step to move and rename the config files. Then, we’ll change the trigger branch and source repository to match the branch.
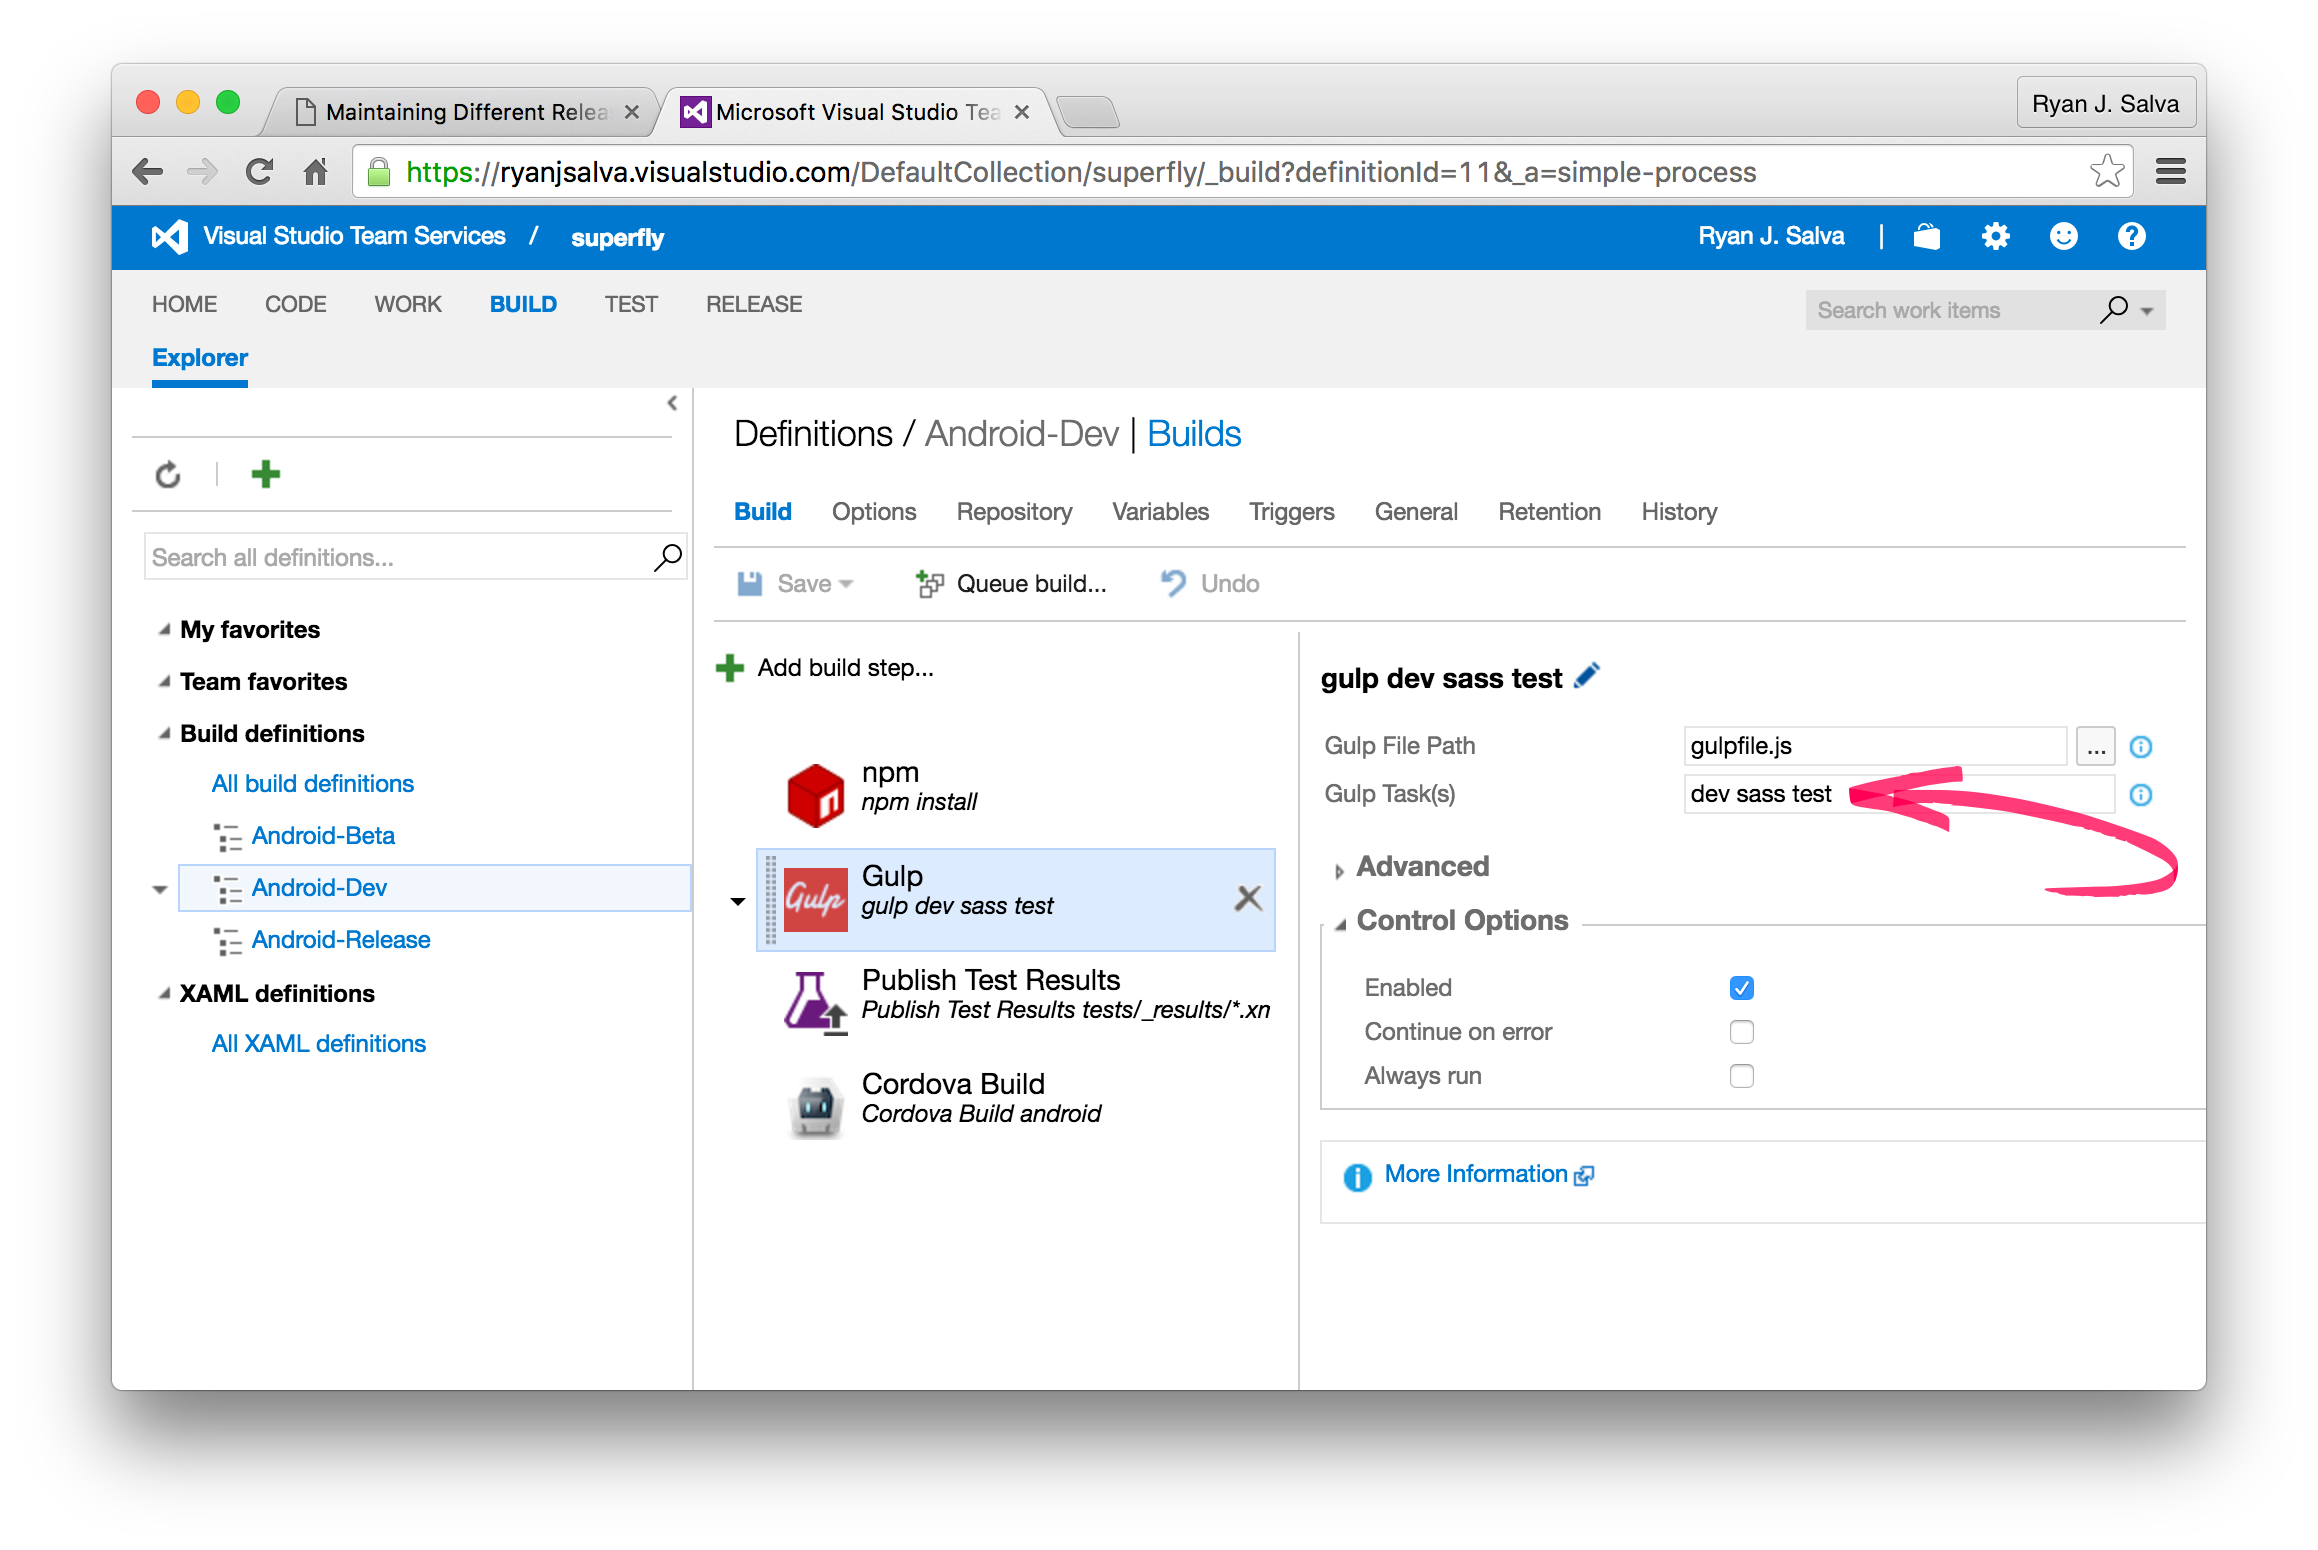
Using the same instance of VSTS that you configured in Parts I, II and III of this series, login and navigate to the “BUILD” tab where you will edit the “Android-Dev” build definition.
Add a space-delimited array of Gulp tasks for dev sass test. In order, these will:
devrename and moves /config/dev.xml to /config.xmlsasscompile SASS to CSStestexecute our Karma+Jasmine tests
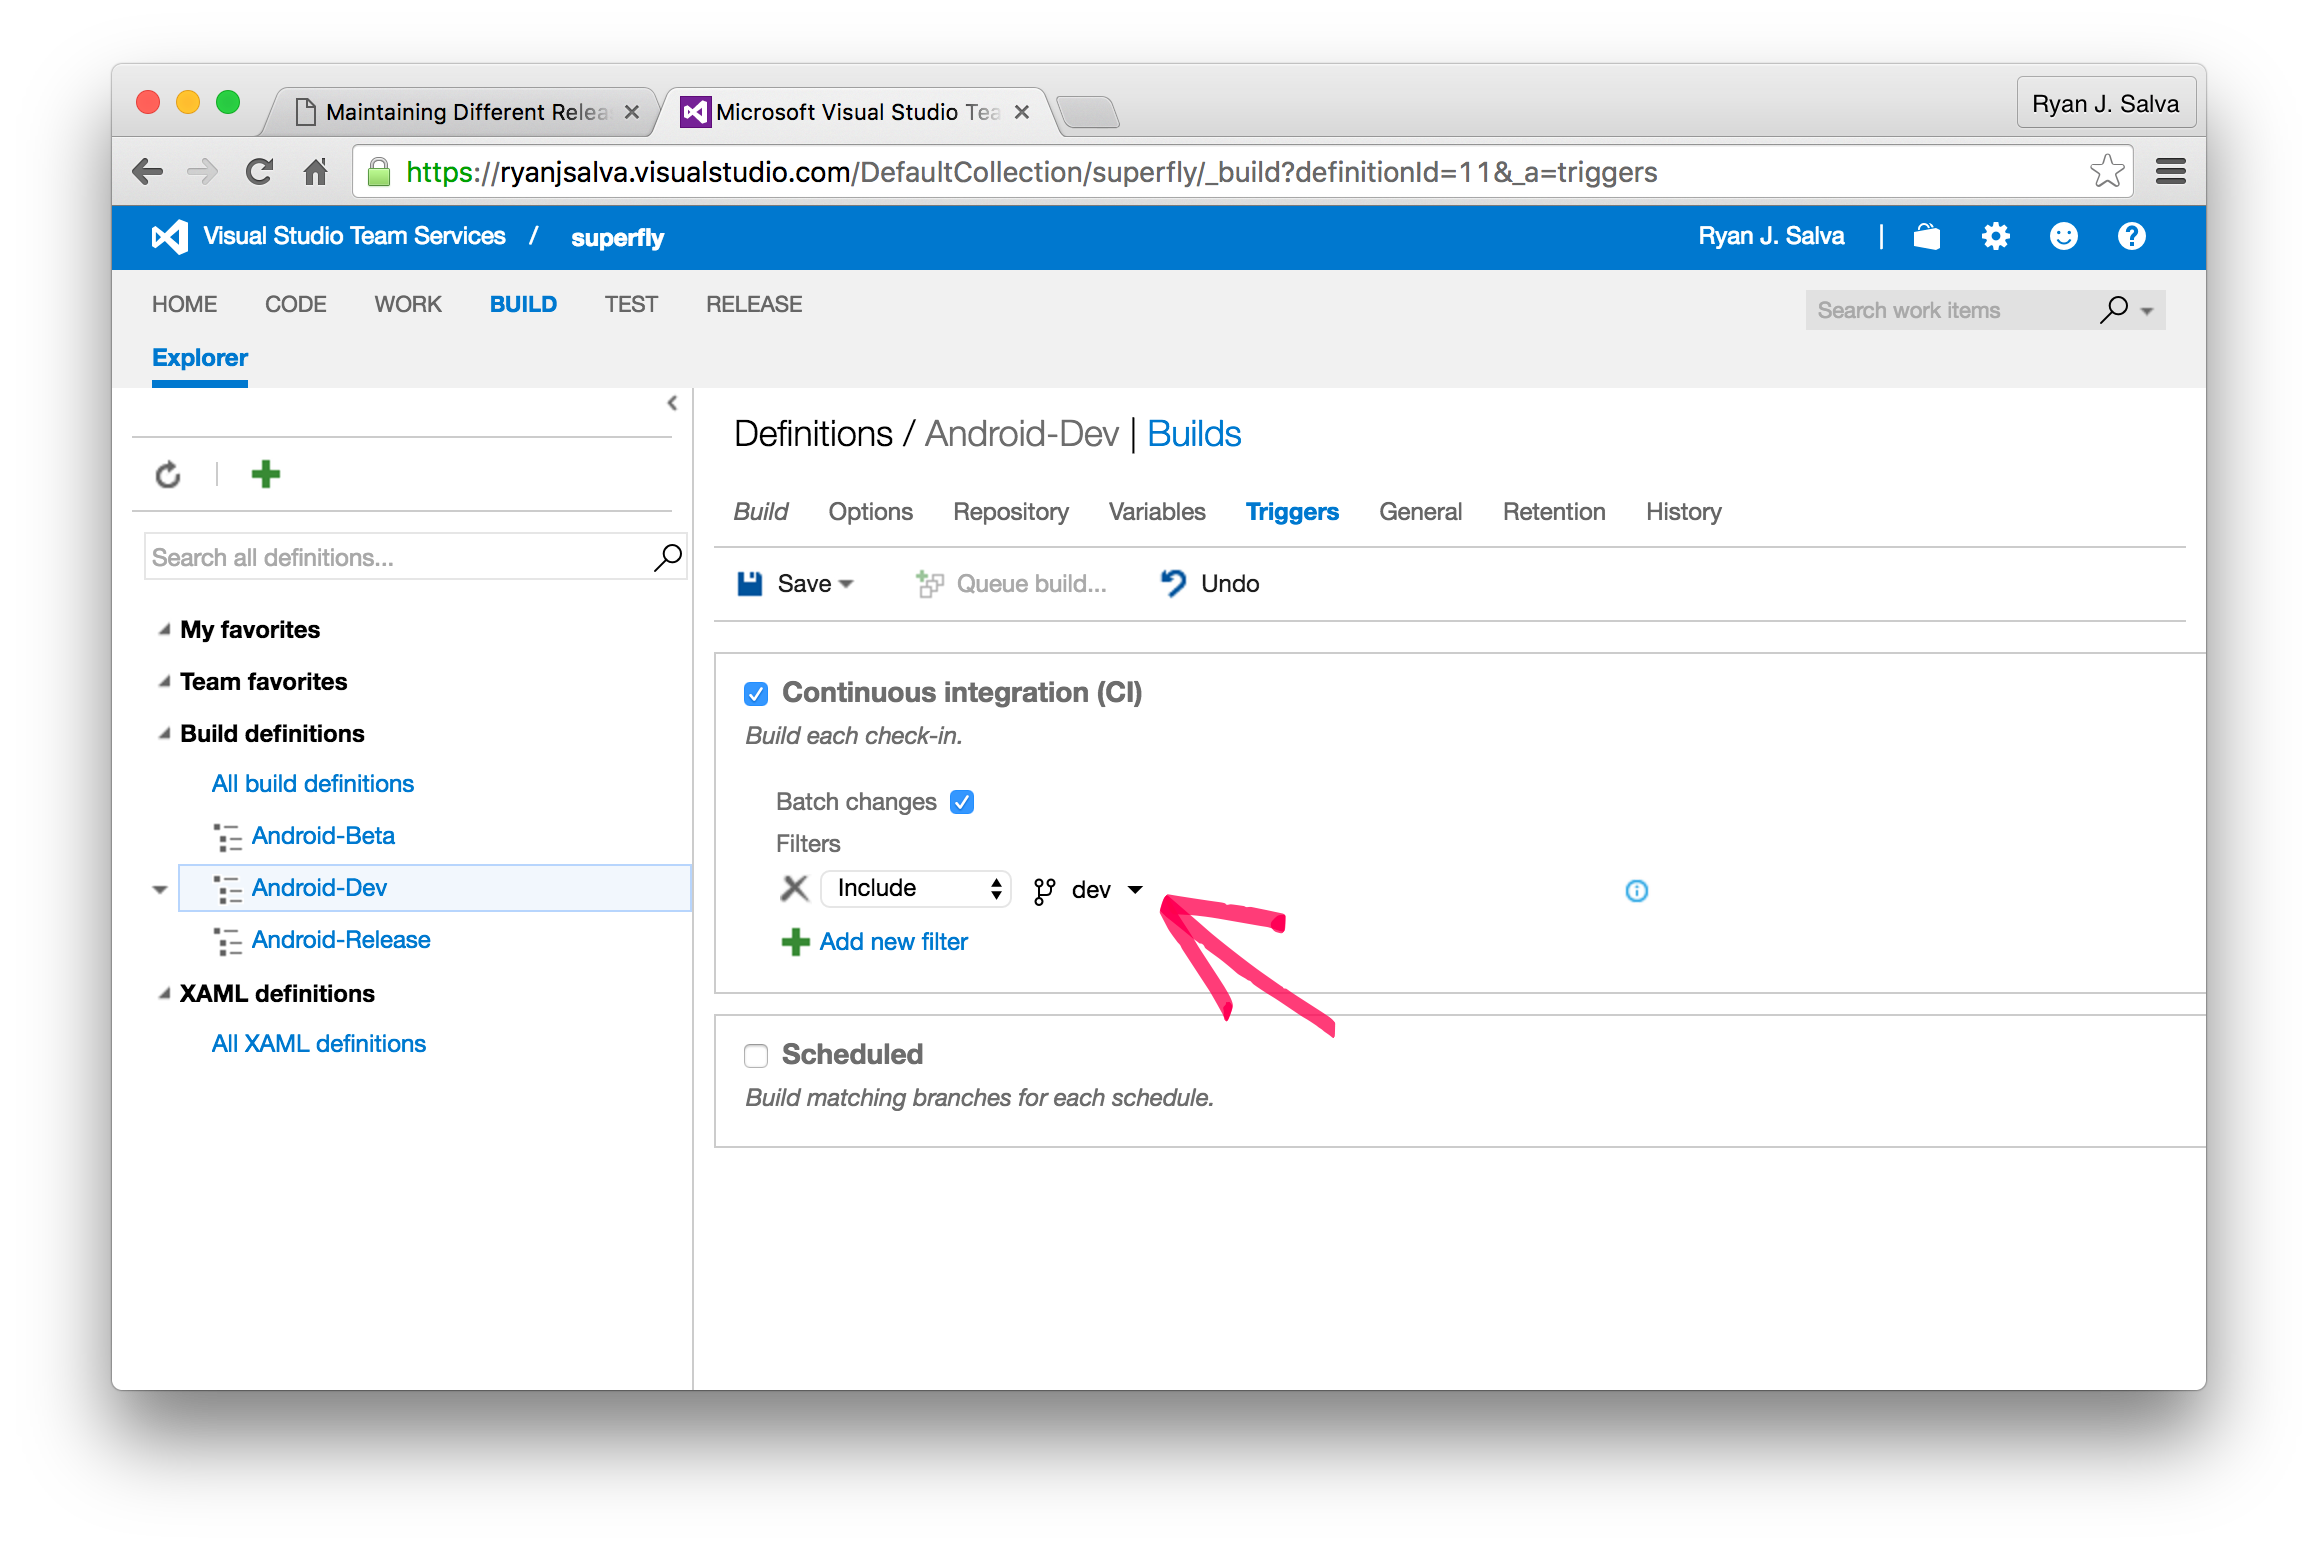
Under the “Triggers” tab, change continuous integration to trigger when code changes in the dev branch.
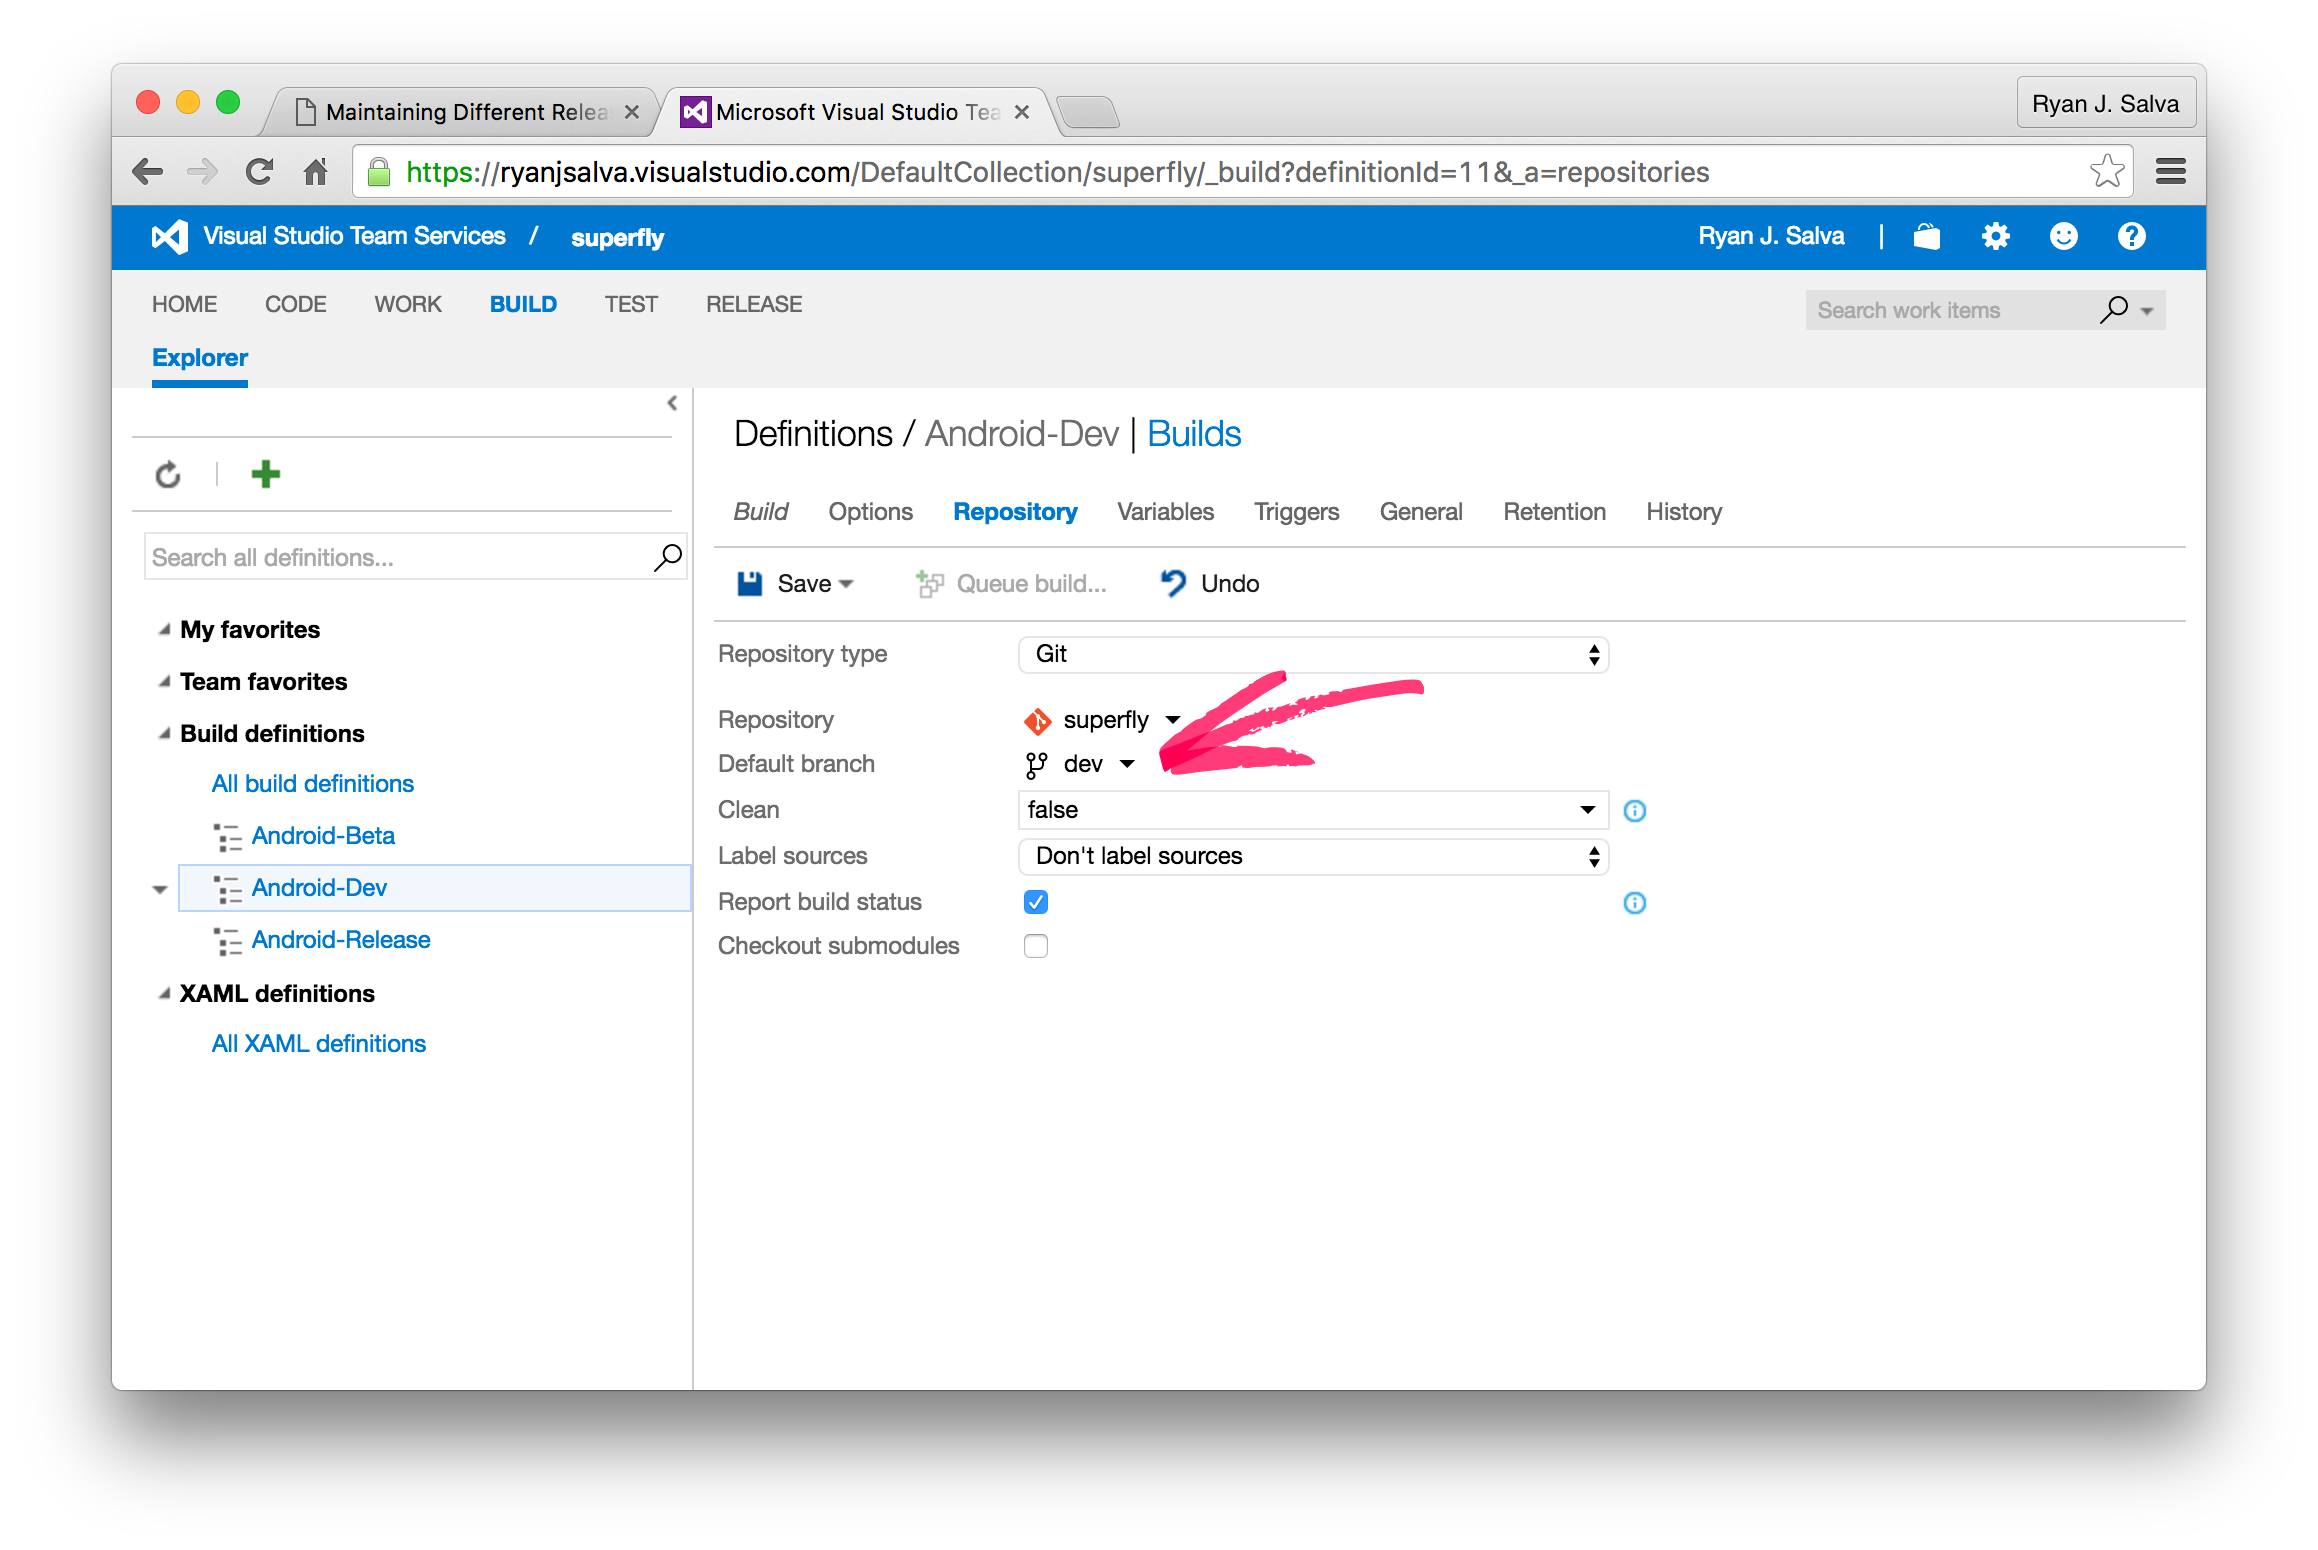
Under the “Prepository” tab, change the default branch to use dev branch as the source repository.
“Android-Beta” and “Android-Release” will follow a similar pattern. You can see a full list of the values below.
| Build Definition | Gulp Tasks | Source Repository | Trigger Filter |
|---|---|---|---|
| Android-Dev | dev sass test | Dev | Dev |
| Android-Beta | beta sass | Beta | Beta |
| Android-Release | release sass | Release | Release |
Checking Our Work
You’ve done all the hard work, now pluck the fruit of your labors. 🍊 In Terminal:
# trigger CI for "Android-Dev" by pushing a change
git checkout dev
git touch readme.md
git commit -m "triggering dev CI"
git push

# trigger CI for "Android-Beta" by pushing a change
git checkout beta
git merge dev
git push

# trigger CI for "Android-Release" by pushing a change
git checkout release
git merge beta
git push
When you return to the VSTS portal, you’ll find the CI builds waiting in the queue. Double-click on any of the builds to see the build output in real-time. Celebrate with a song in your headphones. I recommend “The Commander Thinks Aloud” by The Long Winters.