
Release Without Re-submitting to the App Store
This is part three of a four part series and assumes you’ve already set-up continuous integration with our sample project. If you haven’t already, I highly recommend reading part one, Continuous Integration for Cordova Apps, where we setup the build server used in this tutorial.
JavaScript’s Unfair Advantage
Mobile apps created with JavaScript (e.g. Apache Cordova, ReactNative) enjoy a unique privilege within app stores. Unlike compiled apps that developers can only update through the app store, JavaScript apps can download and install updates from any trusted server.
Imagine this: you’ve just released a major update when… BAM! The one-star reviews start pouring in due to a crashing bug. If you had to re-submit to the app store, you could be waiting days before the store approved and published your new package. By that time, many users will have abandoned your app. The nasty ones might have even written a few flaming store reviews. 🔥
With over-the-air updates, you can deliver bug fixes directly to your customers by downloading new assets (e.g. HTML, CSS, JS, images) from the cloud and replacing the files packaged with your app. In other words, you can deliver updates immediately and on your own schedule.
How does it work?
To understand how updates work, it’s helpful to get a high-level overview of the workflow:
-
The first time you publish, you submit the full app including both compiled code and web assets to the app store.
-
When you want to publish an update, you zip up your web assets (no compiled code) and publish them to the Code-Push cloud service. We’ll talk about different service providers in a moment.
-
On some event (e.g. deviceready, resume, button click), each mobile device checks the Code-Push cloud service for an update.
-
If an update is available, each mobile device downloads the update and replaces the contents of /www with your new code.
Of course, there are lots of optional detours along this path. For example, you could (1) give users the option to skip an update, (2) update a subset of files in /www, or (3) release to only a subset of users. The service itself is very configurable.
Is Apple really cool with it?
Anytime I speak about bypassing the app store, someone invariably asks if this whole thing is really kosher with the app stores. The answer is, “Yes! Yes! A thousand times, yes!” In fact, it’s written into Apple’s developer agreement (emphasis mine). The same goes for Android.

Service Providers
There are a number of plugins & services that make over-the-air updates possible. Cordova developers can choose between PhoneGap Hydration, Ionic Deploy and Code Push. Code Push also happens to be the defacto choice for most ReactNative developers, so our example will use it.
Let’s code (push)
Again, our tutorial will use the superfly sample project and Visual Studio Team Services (VSTS) setup in part one of this series.
Like other device capabilities, Code Push has it’s own Cordova plugin (cordova-plugin-code-push) which has already been added to our sample project. You can see the reference in config.xml:
<plugin name="cordova-plugin-code-push" spec="~1.6.0-beta" />Create Your Code-Push Service
To register for the Code Push service, you must first install the Code Push CLI. From your terminal…
# install code-push globally
npm install -g code-push-cli

# sign up for the free code-push service
code-push register
This second command will open a browser where you should simply follow the registration process. As usual, it’s free to use, so don’t worry about pulling out the credit card. 💸
Manage Deployments
Once you’ve registered, go back to the command line where we’ll register our first app with the Code Push service.
code-push app add superflyCode Push will return two deployment keys: Staging and Production. These keys are used to identify your app when making a request to the Code Push service and will be saved in config.xml. If you lose the key, don’t worry. You can retrieve it at any time by executing:
code-push deployment list superfly -kUnder most circumstances, you’ll want to deploy to iOS and Android separately. After all, if a bug fix is unique to Android, we don’t want to inconvenience iOS users with an unnecessary update. So, let’s prepare for the future by creating separate deployment keys for iOS and Android.
# rename the default Staging key for Android
code-push deployment rename superfly Staging Staging-Android

# rename the default Production key for Android
code-push deployment rename superfly Production Production-Android

# create a new Staging key for iOS
code-push deployment add superfly Staging-iOS

# create a new Production key for iOS
code-push deployment add superfly Production-iOS

# make sure we got it right
code-push deployment list superfly -k
Add the Deployment Key to Your App
You’ve created deployment keys for each platform. Now, it’s time to save those deployment keys with your app. Open config.xml in the superfly project and insert the Staging-Android and Staging-iOS deployment keys where indicated:
<platform name="android">
    <preference name="CodePushDeploymentKey" value="YOUR-ANDROID-DEPLOYMENT-KEY" />
</platform>
<platform name="ios">
    <preference name="CodePushDeploymentKey" value="YOUR-IOS-DEPLOYMENT-KEY" />
</platform>
Notice that we’re hard-coding the deployment keys in config.xml. In part four of this series, I’ll show you how to dynamically change keys based on your deployment target (e.g. Staging or Production).
Safety first!
Any Cordova app using version 5 or greater is required to use the whitelist plugin and declare a Content Security Policy (CSP). The CSP essentially answers the question, “what domains are trusted to provide data?” To establish trust with the Code Push server, we need to add the following meta tag to index.html:
<meta http-equiv="Content-Security-Policy" content="script-src https://codepush.azurewebsites.net http://localhost:* 'self' 'unsafe-inline' 'unsafe-eval'; media-src *"> Translated into English this CSP says, “It’s okay to execute JavaScript from…”
👍 https://codepush.azurewebsites.net
👍 http://localhost
👍 Any file referenced in root directory
👍 Inline <script> tags
👍 eval() statements are also OK
👍 Images, videos and other media can come from anywhere
Invoke the Code-Push API
We’ve already established our app’s identity by created deployment keys. Now, we need to tell the app how and when to ping the Code Push service for an update. For demonstration purposes we’re simply going to check for updates when clicking a menu item, but you may want to use app lifecycle events like deviceready. Our button can be found in /www/templates/menu.html.
<!-- Code Push -->
<a class="item item-icon-left" ng-click="codePush()">
    <i class="icon ion-ios-cloud-download-outline"></i>Check Update
</a>
… and the handler in /www/js/controllers.js
/* ---------------------------------------------------------------
   codepush check for update */
$scope.codePush = function() {
    console.log('check for code push update');

    var updateDialogOptions = {
        updateTitle: "Update",
        mandatoryUpdateMessage: "You will be updated to the latest version of the app.",
        mandatoryContinueButtonLabel: "Continue",
        optionalUpdateMessage: "Update available. Install?",
        optionalIgnoreButtonLabel: "No",
        optionalInstallButtonLabel: "Yes",
    };

    var syncOptions = {
        installMode: InstallMode.ON_NEXT_RESTART,
        updateDialog: updateDialogOptions
    };

    var syncStatusCallback = function (syncStatus) {
        switch (syncStatus) {
            // Result (final) statuses
            case SyncStatus.UPDATE_INSTALLED:
                $ionicPopup.alert({
                    title: "Sweet Success",
                    template: "Restart your app to complete the update."
                });
                break;
            case SyncStatus.UP_TO_DATE:
                $ionicPopup.alert({
                    title: "All Good",
                    template: "Your application is up to date."
                });
                break;
            case SyncStatus.UPDATE_IGNORED:
                console.log("The user decided not to install the optional update.");
                break;
            case SyncStatus.ERROR:
                $ionicPopup.alert({
                    title: "@#$!",
                    template: "Something went wrong. Try restarting your app."
                });
                break;

            // Intermediate (non final) statuses
            case SyncStatus.CHECKING_FOR_UPDATE:
                console.log("Checking for update.");
                break;
            case SyncStatus.AWAITING_USER_ACTION:
                console.log("Alerting user.");
                break;
            case SyncStatus.DOWNLOADING_PACKAGE:
                console.log("Downloading package.");
                break;
            case SyncStatus.INSTALLING_UPDATE:
                console.log("Installing update");
                break;
        }
    };

    window.codePush.sync(syncStatusCallback, syncOptions);
}
// --------------------------------------------------------------- */
While this looks complicated, it’s really quite simple once you break it down.
updateDialogOptions {...}provides optional text and styling informationsyncOptions {...}tells Code Push to replace the content of /www on restartsyncStatusCallbackhandles the range of possible responses from the Code-Push servicewindow.codePush.sync(...)invokes the actual codePush API
The truth is that you could omit items 1-3 and just let Code Push do everything with window.codePush.sync(), but it’s nice to see what’s possible with a fully customized implementation.
Automate Deployments with VSTS
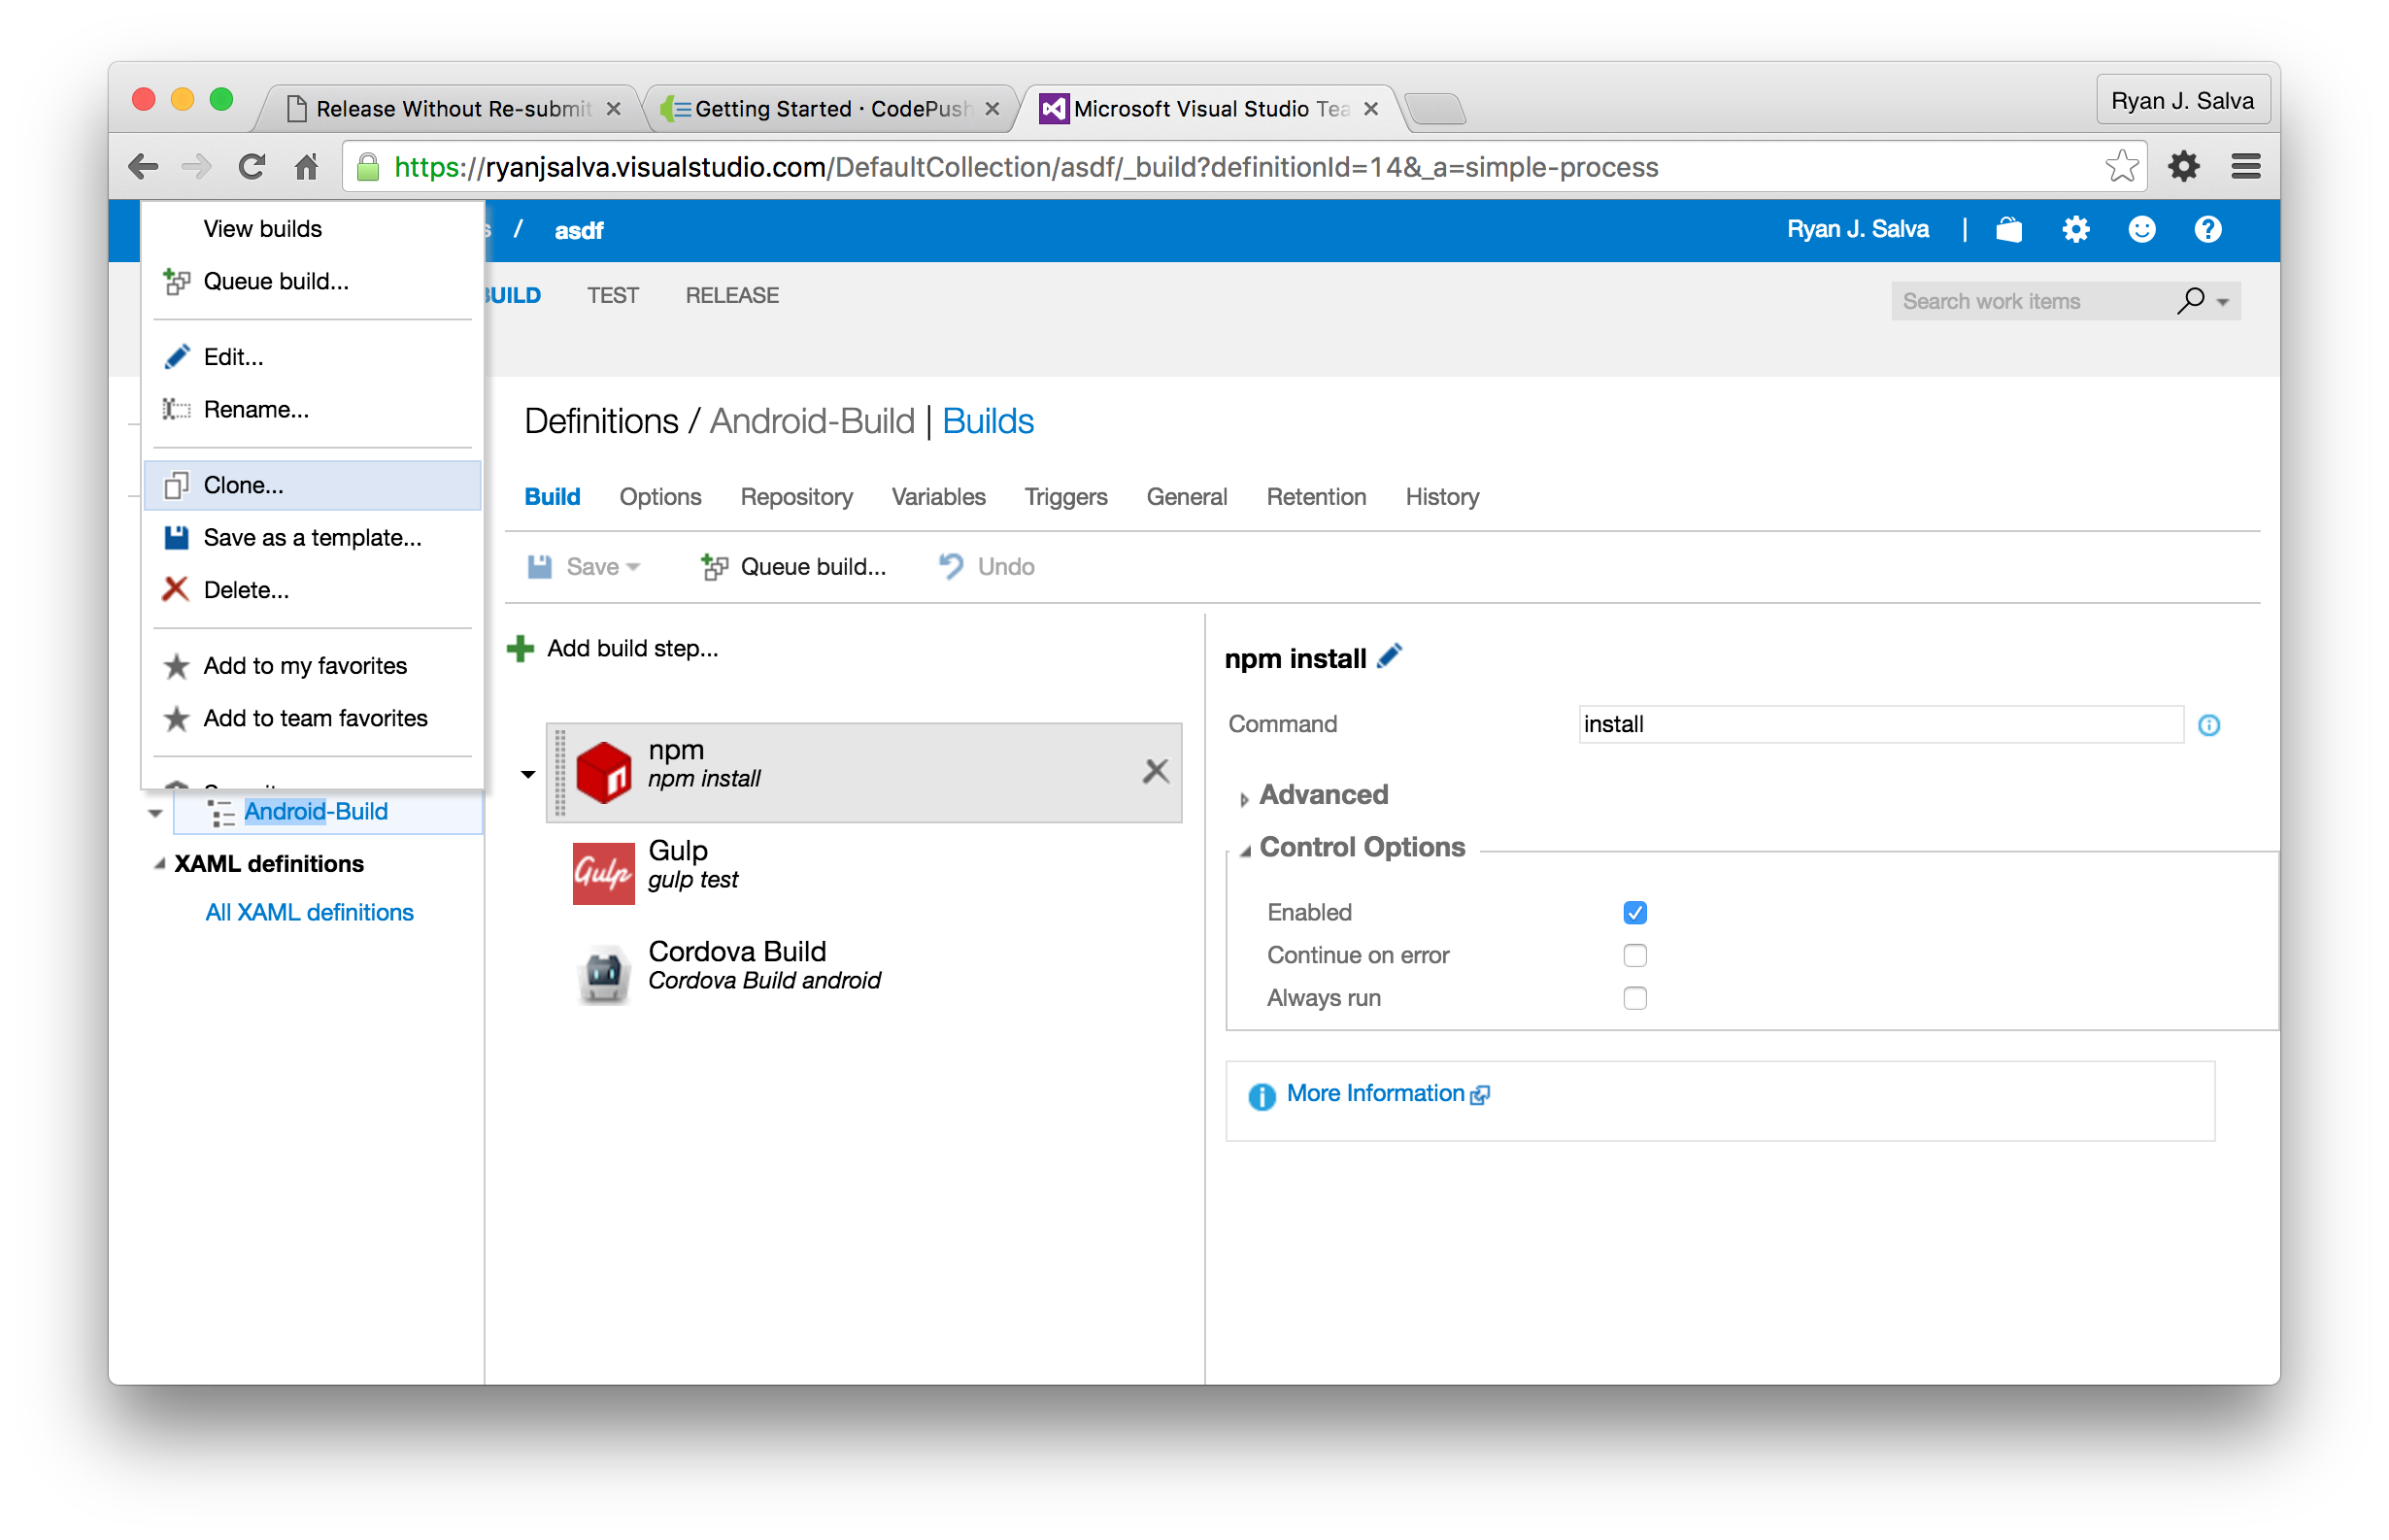
Similar to the steps followed in part two of this series, we’re going to clone our pre-existing build definition and add a Code Push build step. Login to VSTS and navigate to the BUILD tab. Right-click on the “Android-Build” definition and select Clone.
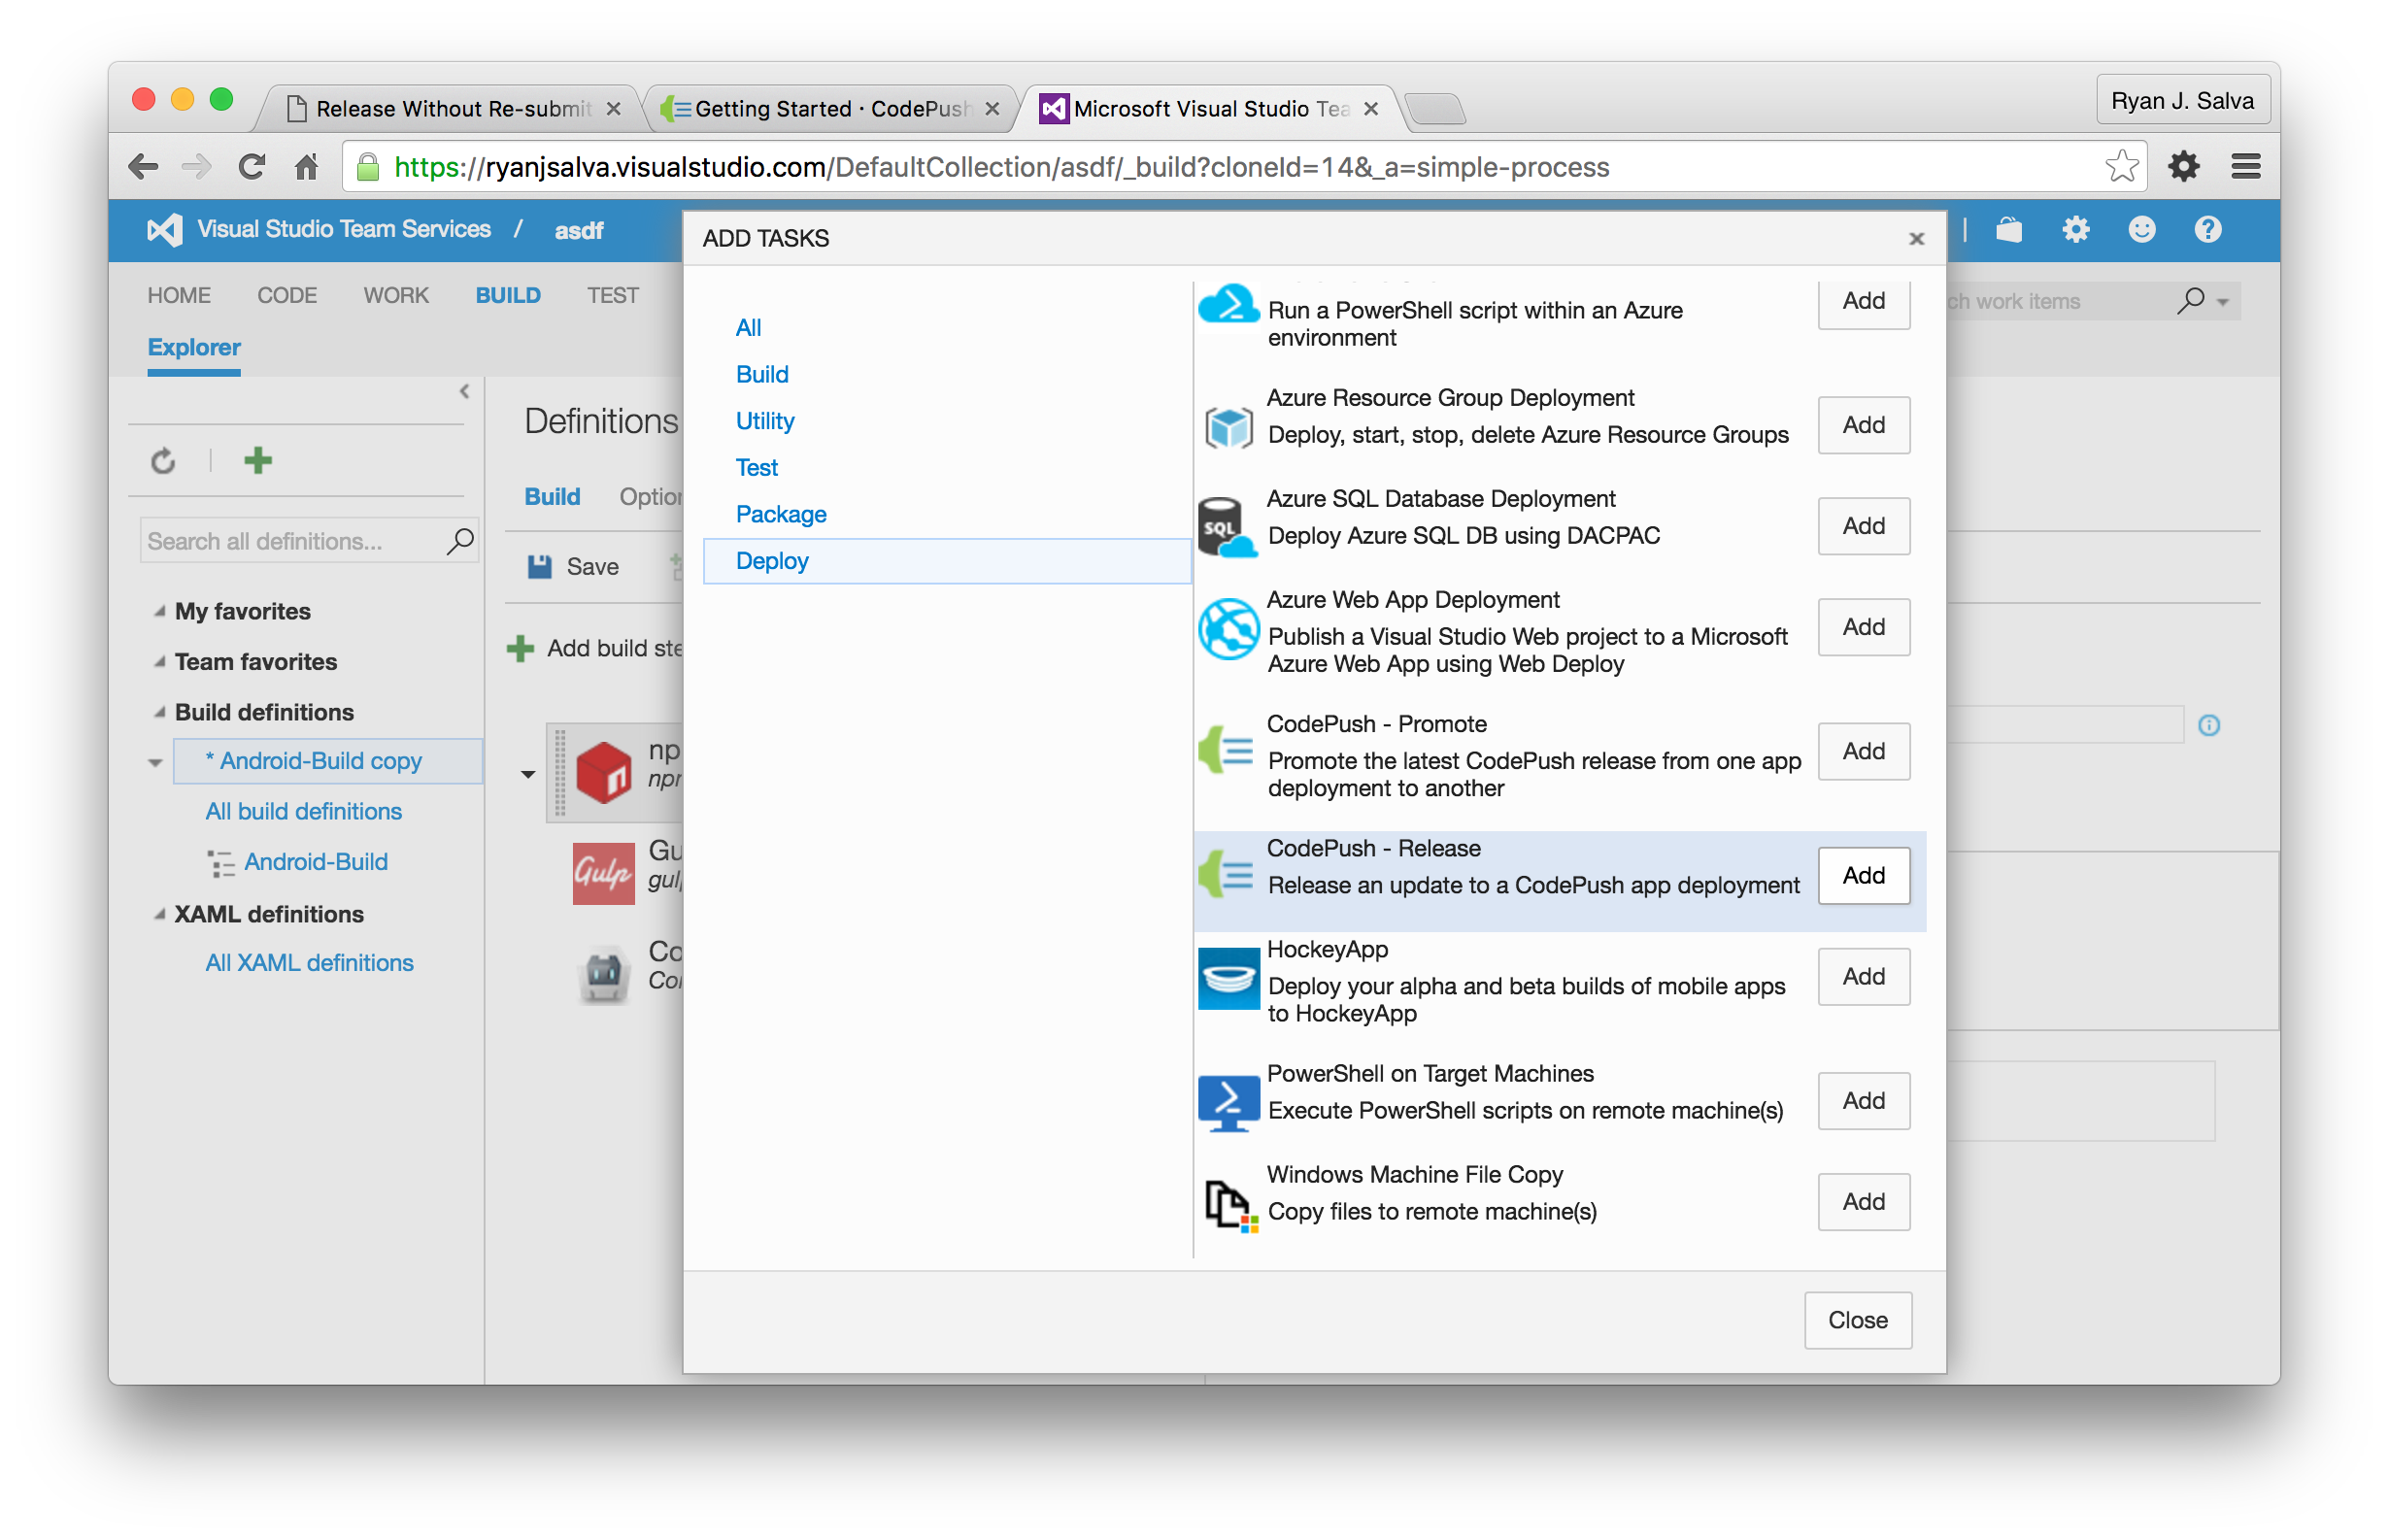
With the new build definition selected, click “Add build step” and choose “Code Push - Release” from the Deploy category.
Configure Your Code Push Build Step
Once you’ve added the build step, you’ll need to configure it as pictured below:
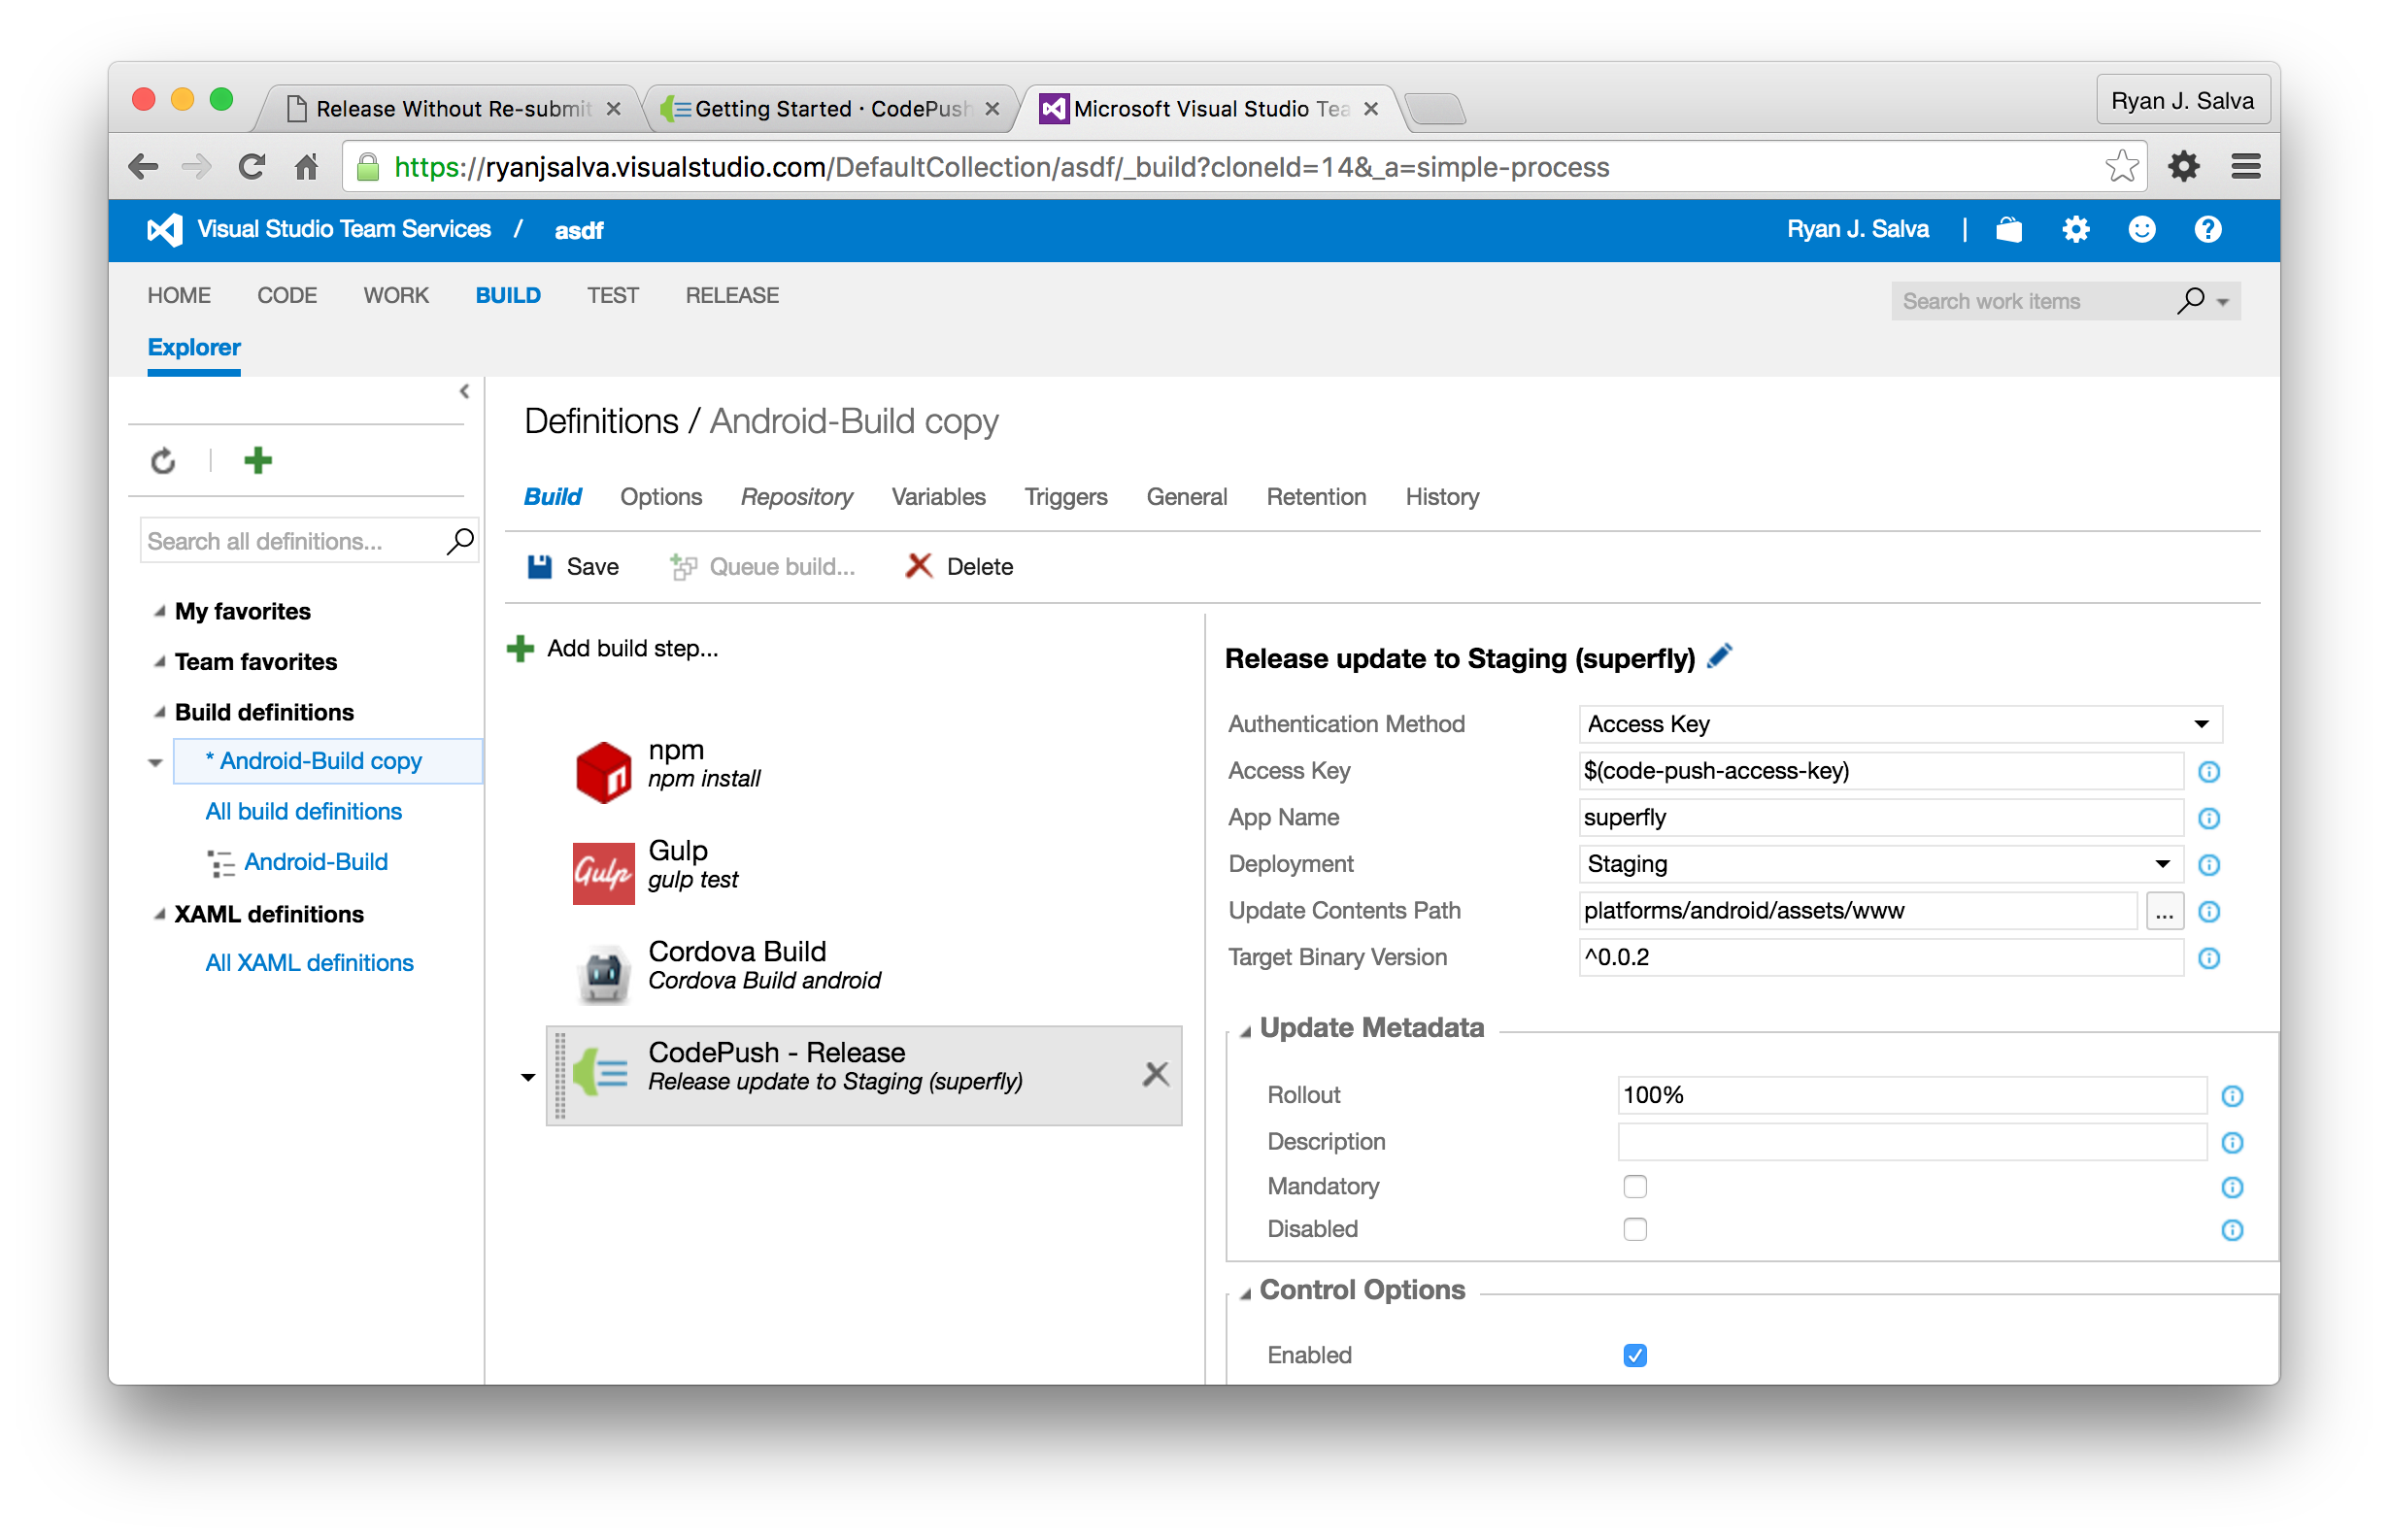
| Label | Value | Why? |
|---|---|---|
| Authentication Method | Access Key | Establishes trust with the Code Push cloud service |
| Access Key | $(code-push-access-key) | To protect our access key, we’ll encrypt it in a variable |
| App Name | superfly | This is human readable app name published to the store |
| Deployment | Staging | We’ll use staging while testing |
| Update Contents Path | platforms/android/assets/www | Default location where Cordova outputs the web assets for Android |
| Target Binary Version | ^0.0.2 | Semantic Versioning. This says, “install the update if you’re installed app is of version 0.0.2+n” |
| Rollout | 100% | Deploy this update to 100% of possible users |
| Descrition | You can display this message to users before an update | |
| Mandatory | Unchecked | Don’t require this update |
| Disabled | Unchecked | We want to run this build step |
| Enabled | Checked | We want to run this build step |
| Continue on error | Unchecked | Stop the presses when there’s a build error |
| Always run | Unchecked | Since we never continue on error, it’s okay to leave this unchecked |
Establish Trust Between VSTS and Code Push
As you probably noticed above, we referenced a VSTS build variable to store $(code-push-access-key), but haven’t actually created one yet. Remember, the Access Key establishes a bond of trust between VSTS and the Code Push service so that VSTS can deploy on your behalf. To get your Access Key, go to the command line and execute:
# create the access key
code-push access-key add superfly
This command will return a 32 character key. Back in VSTS, go to the Variables tab and add a variable named “code-push-access-key” using your new key. To protect it from prying eyes, select the lock icon to the right of the input box.

Deploy on Commit
At last, we’re ready to commit our code changes and use Code Push to deploy our update over-the-air. Make sure “Continuous Integration” is checked under the Triggers tab and save this build definition as “Android-Release.”
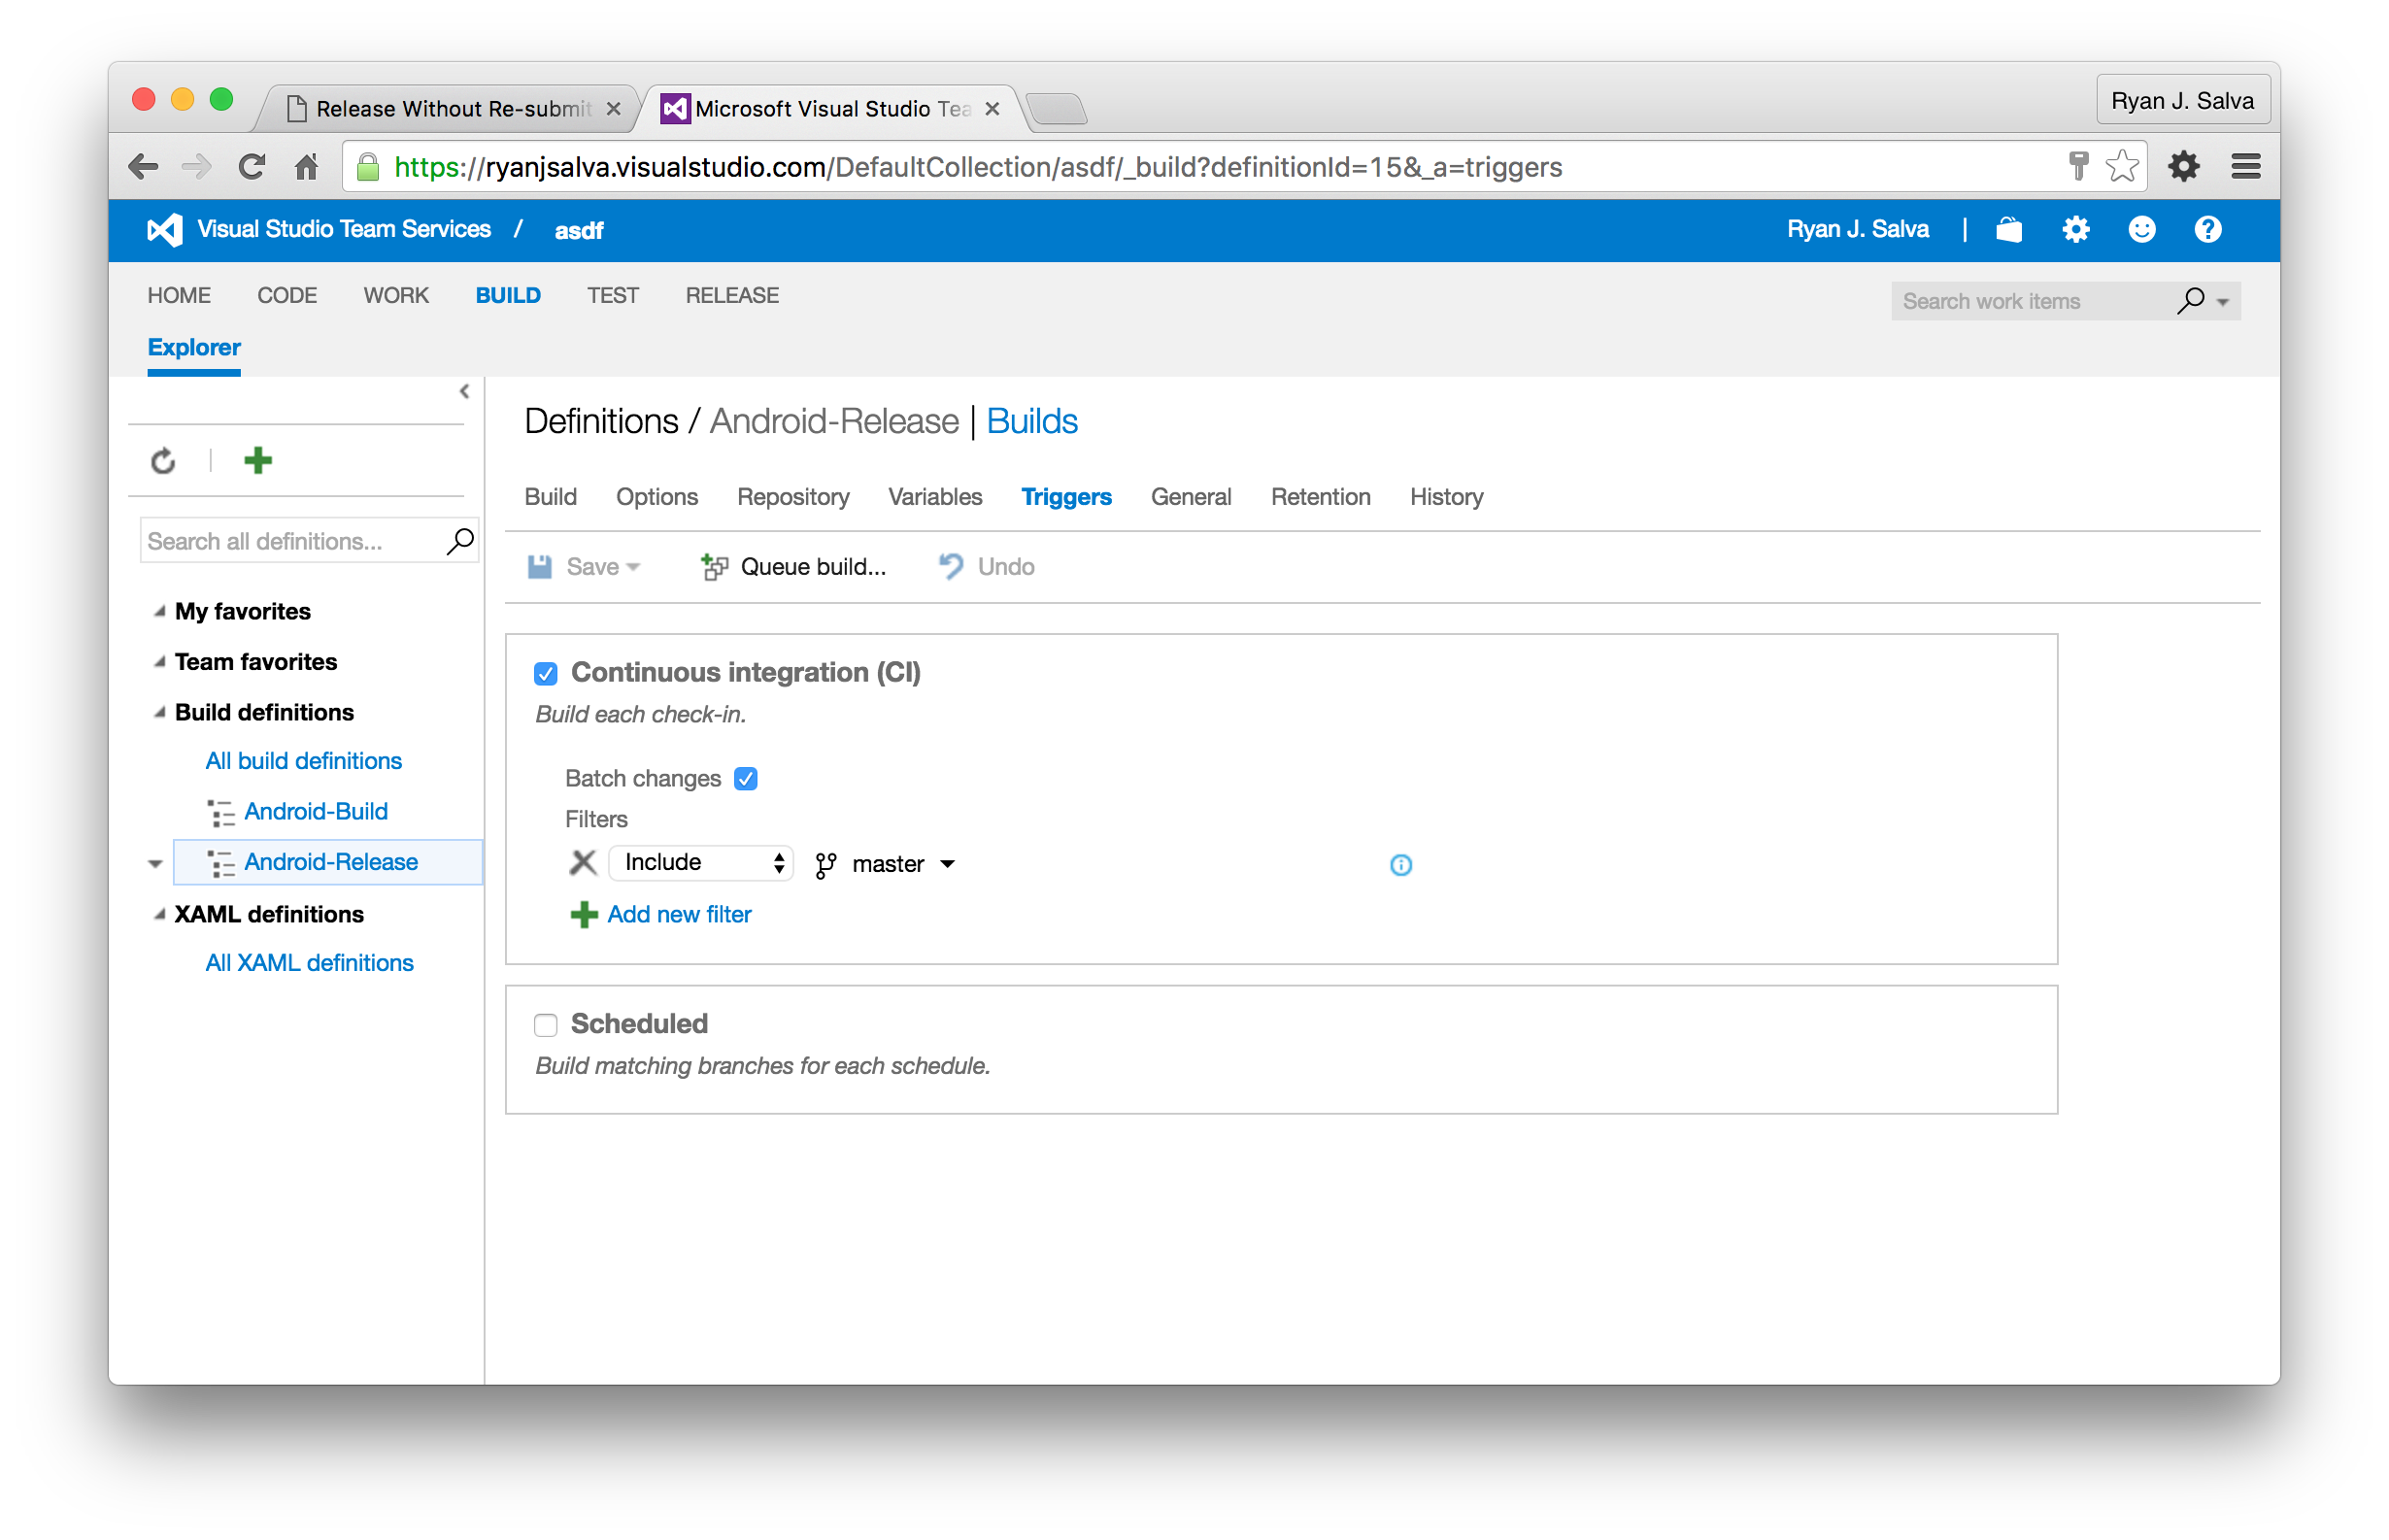
With “Continuous Integration” checked, this build definition will run every time someone commits code to the master branch. To trigger the next build, open your terminal and push the latest changes…
git commit -m "Add code push"
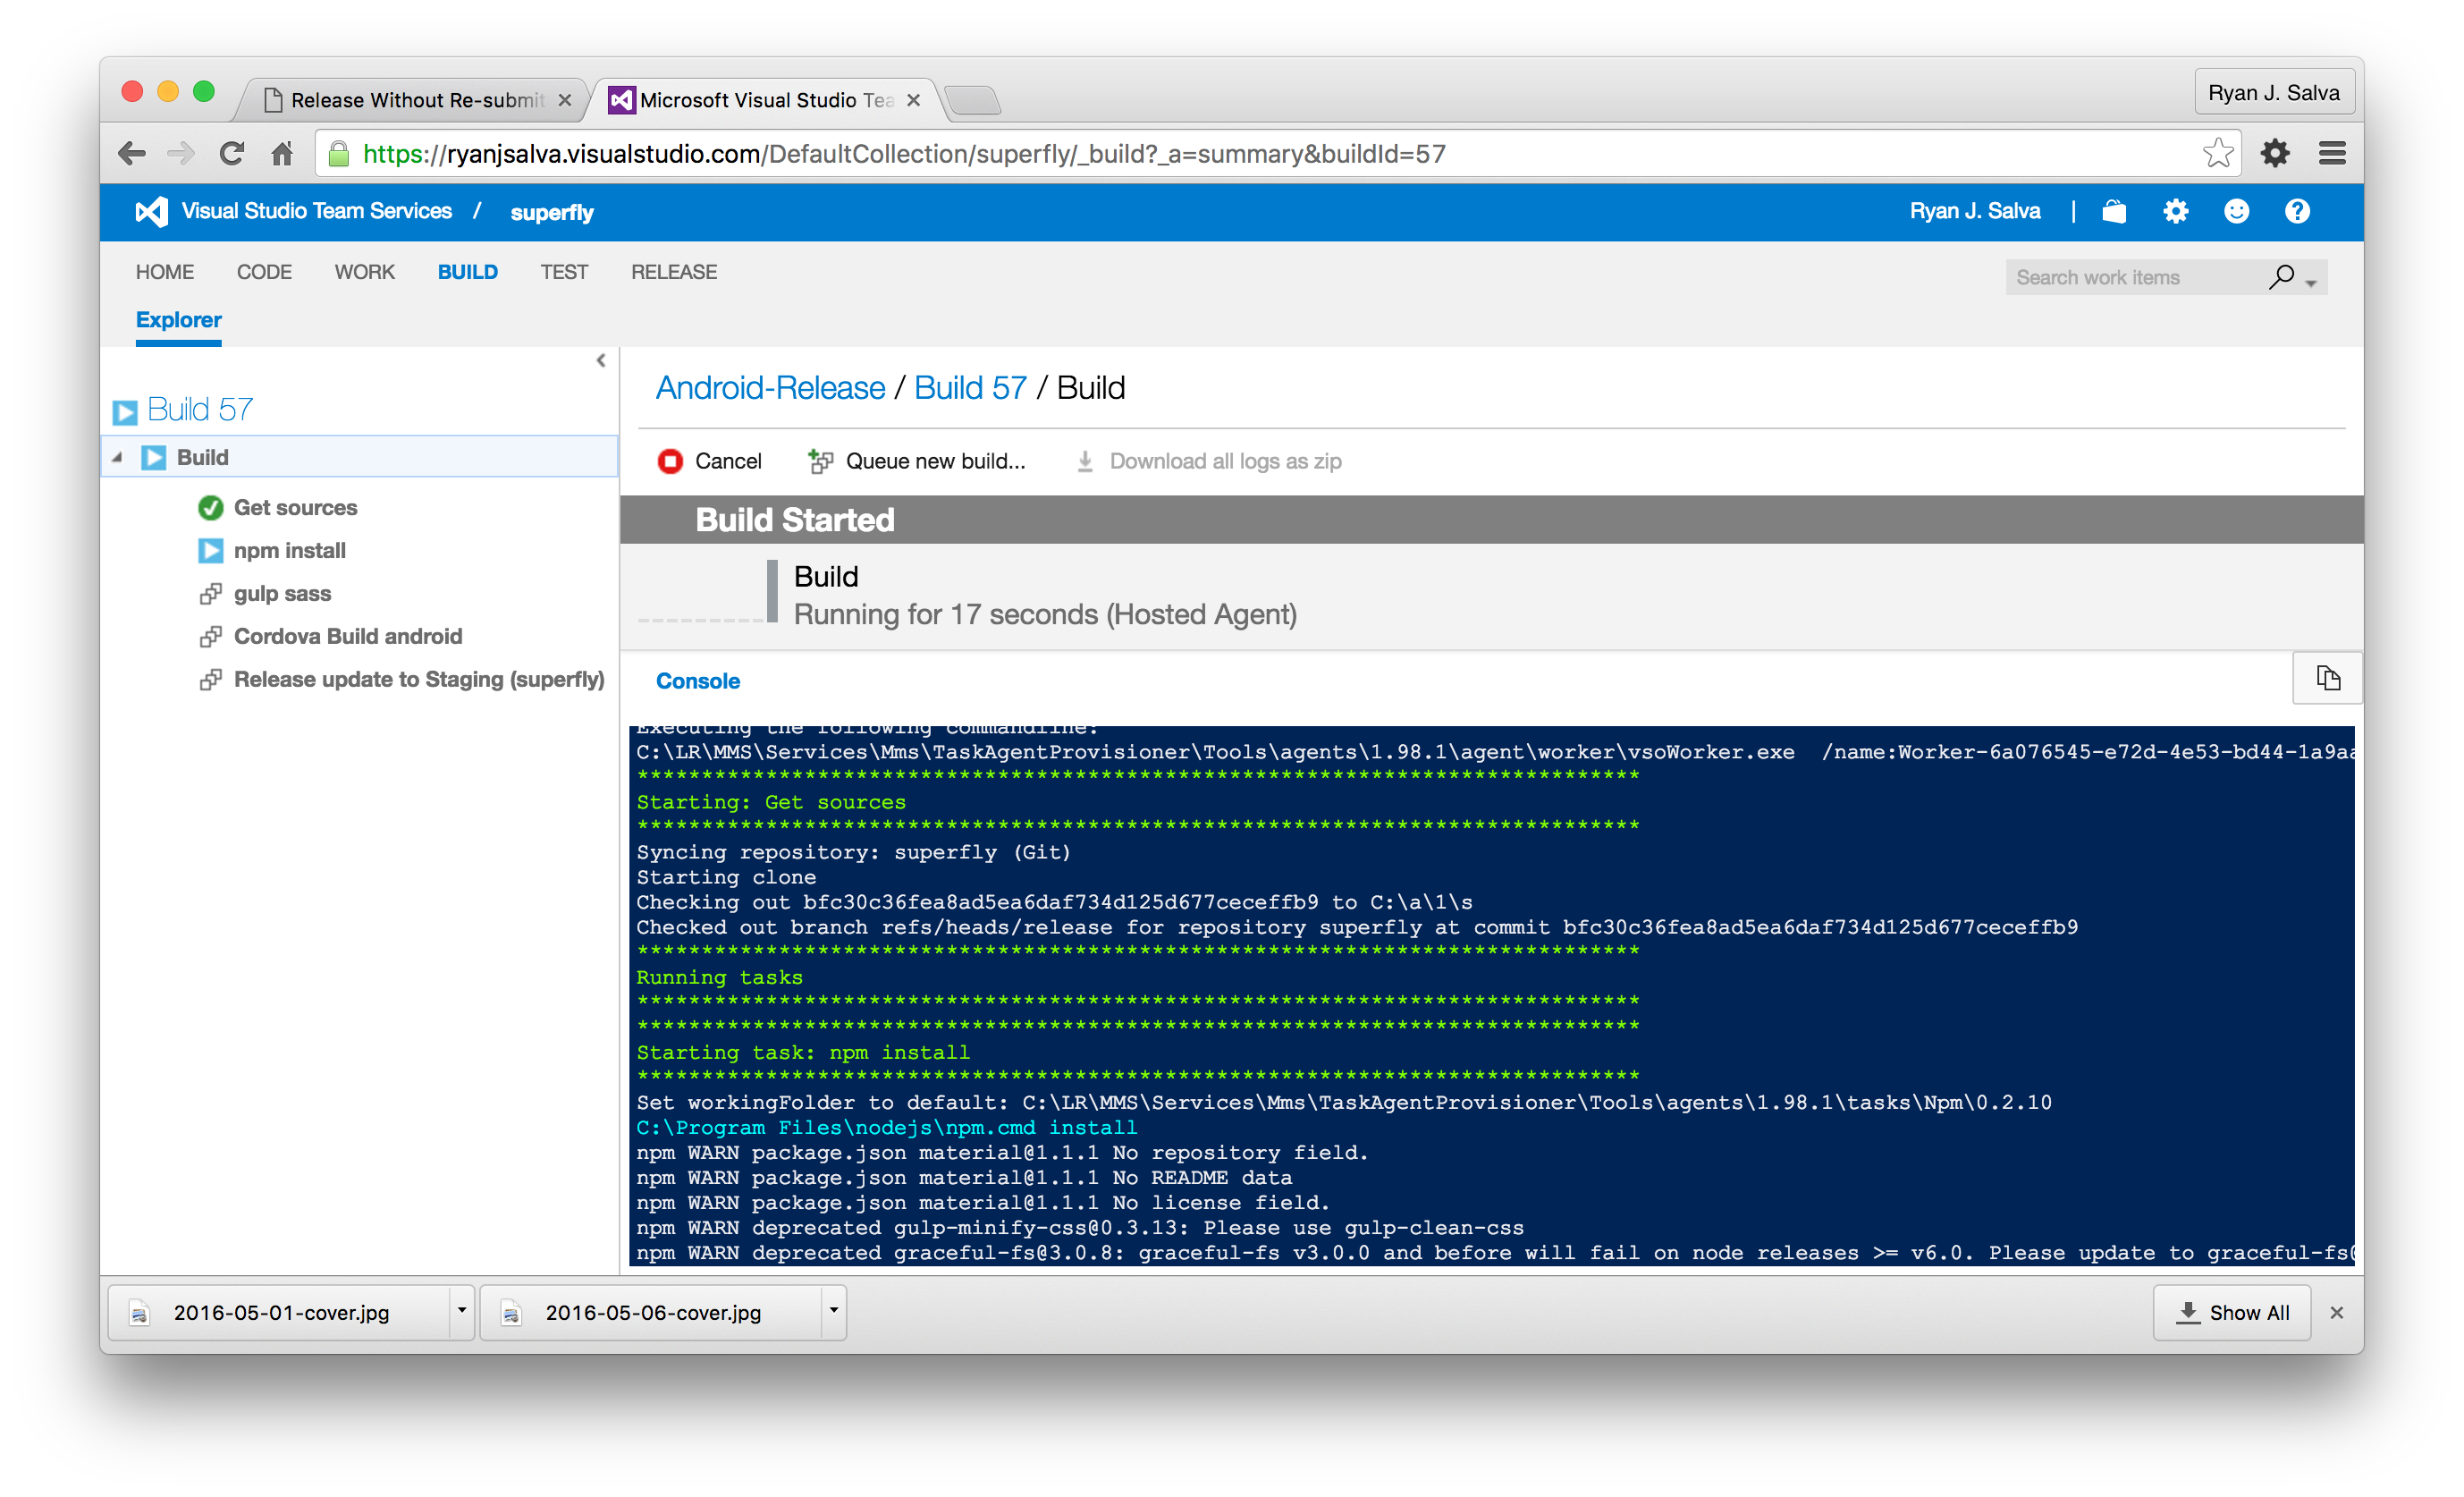
git pushOnce the files have transferred, you should be able to see your build complete in VSTS. Select “Android-Release” then double-click on the build number under “Queued Builds”.
Open the App and Check for Updates
To see Code Push in action, deploy the app to a local device or emulator. I’m using a Nexus 5 running Android Marshmallow (because I’m fresh like that). From your terminal…
cd ~/Code/superfly
cordova run android --device
From the running app, open the slide-in menu and select “Code Push Update”

TA-DA! Your app will update on restart.